
Night and off-peak lane closures can protect daytime capacity, but they also concentrate risk into a darker, faster-changing environment. At night, a work zone is only as safe as it is visible: drivers must recognize the pattern early and commit to the correct path, and crews must see the task without glare or dark pockets. [2][6]
This 2026 guide is for Illinois contractors, project managers, superintendents, safety managers, and business owners planning nighttime or off-peak lane closures. It is a visibility-first playbook built around lighting, glare control, device performance, daily inspection routines, change control, and closeout, with step-by-step checklists crews can follow. [1][4][6]
Table of Contents
What Makes Night and Off-Peak Closures Different in Illinois
Night work changes how people drive and how crews work. Headlights compress depth perception and color cues, while wet pavement can mirror lights and wash out lane lines. A layout that looks “fine” in daytime can be confusing at night if the taper is not straight, sign faces are dirty, or a bright light creates glare at the decision point.
Illinois conditions add volatility. Rain sheen, fog, blowing snow, and winter grime can flatten contrast and reduce device readability within a single shift unless you clean and recheck devices. [6]
Visibility-first mindset: Treat every traffic control element as a performance item you can verify. If drivers cannot read the message early enough to act, or workers cannot see the task without strain, the control is not functioning, even if it is physically present. [6]
Off-peak lane closure planning can reduce exposure to peak traffic volumes, but it also compresses setup, production, and closeout into tight windows. Night/off-peak guidance emphasizes shift-specific planning and staffing that are adapted to darkness, not just moving the same plan to a quieter hour. [2]
Before you commit to a night window, run this quick self-check:
- Can approaching drivers recognize the work zone early (advance warning, taper start, merge point)?
- Can you light the task without aiming light into approaching traffic?
- Do you have enough people to inspect and maintain devices during production, not only at opening?
- Do you have clear triggers for pausing work and documenting changes? [4][6]
Pre-Mobilization Planning: From Scope to Stakeholder Alignment
A smooth night closure is decided before the first cone leaves the truck. Pre-mobilization planning reduces improvisation, which is a common driver of night shutdowns.
Work window math: Build a time budget that includes mobilization, setup, an opening inspection, production, rolling checks, closeout, and a final drive-through. Add buffer so you do not force unsafe shortcuts near the end of the shift. [2][6]
Roles and authority: Define who owns each phase, who performs the rolling device check, who controls lighting adjustments, and who has stop-work authority. Also define who can approve minor field adjustments and who must be contacted for changes that alter the footprint, access, or protection strategy. Federal work zone safety and mobility requirements depend on accountable processes. [4][5]
Illinois readiness: Confirm the project-specific requirements and state work zone safety materials that apply to your job, then translate them into shift-level instructions the field can execute. [3]
Pre-mobilization package: Keep a night-ready packet with the approved layout, a lighting plan, an equipment and device condition check, the night inspection checklist, a one-page change log, and an escalation list. [4][6]
Night shift kit: Stock spare batteries, replacement lamps, cleaning supplies, and extra channelizers for taper repairs. If you use generators, keep fueling and service activities outside live traffic. [6]

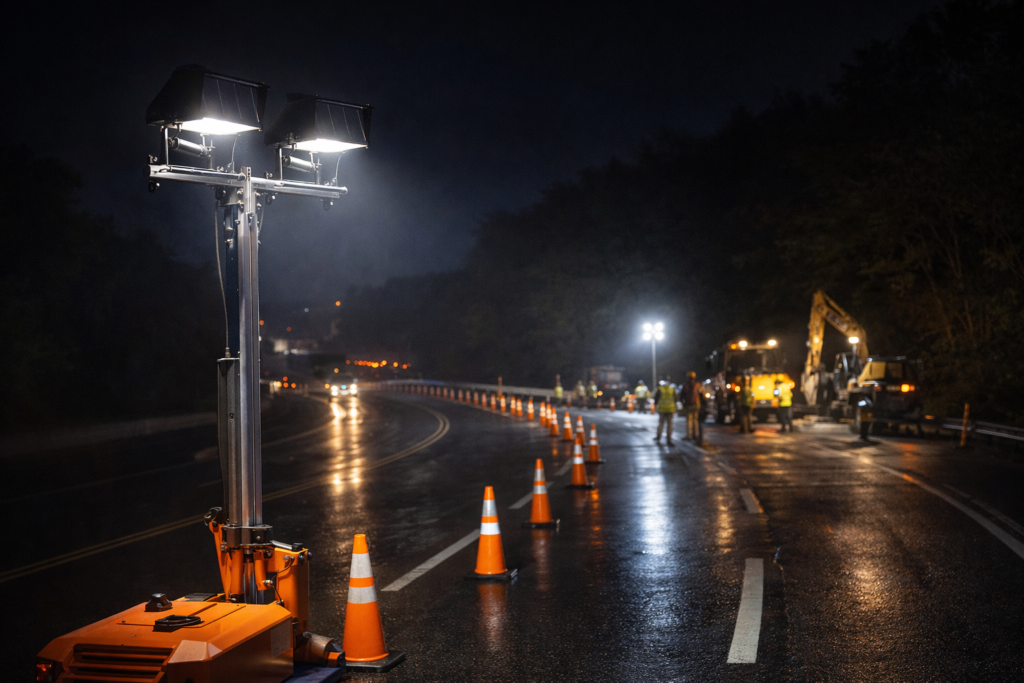
Build a Visibility-First Lighting and Glare Plan
Temporary work zone lighting has two jobs: support driver guidance and support the work task. Poorly aimed lighting can reduce safety by creating glare and hiding the taper inside a bright haze.
Lighting plan essentials: A usable lighting plan defines the objective by zone (taper, buffer, activity area, pedestrian detour), equipment type and quantity, placement and aiming notes, glare controls, power and fueling logistics, and inspection triggers for re-aiming or adding light. [6]
Glare control rules: Aim, shield, then verify from the driver approach.
- Aim lights down and across the task, not along the driver line of sight
- Keep bright sources out of the upstream approach view when possible
- Avoid placing bright light directly behind retroreflective signs or channelizers
- Reduce hot spots by staggering light positions and overlapping coverage
- Re-aim after major equipment moves, because shadows and sight lines change [6]
Mini-summary: In most night closures, controlled illumination that preserves contrast is safer than maximum brightness.
A practical field test is a short approach drive after setup is complete. If drivers see glare before they see guidance, adjust the plan before production ramps up and document what changed for the next shift. [6]
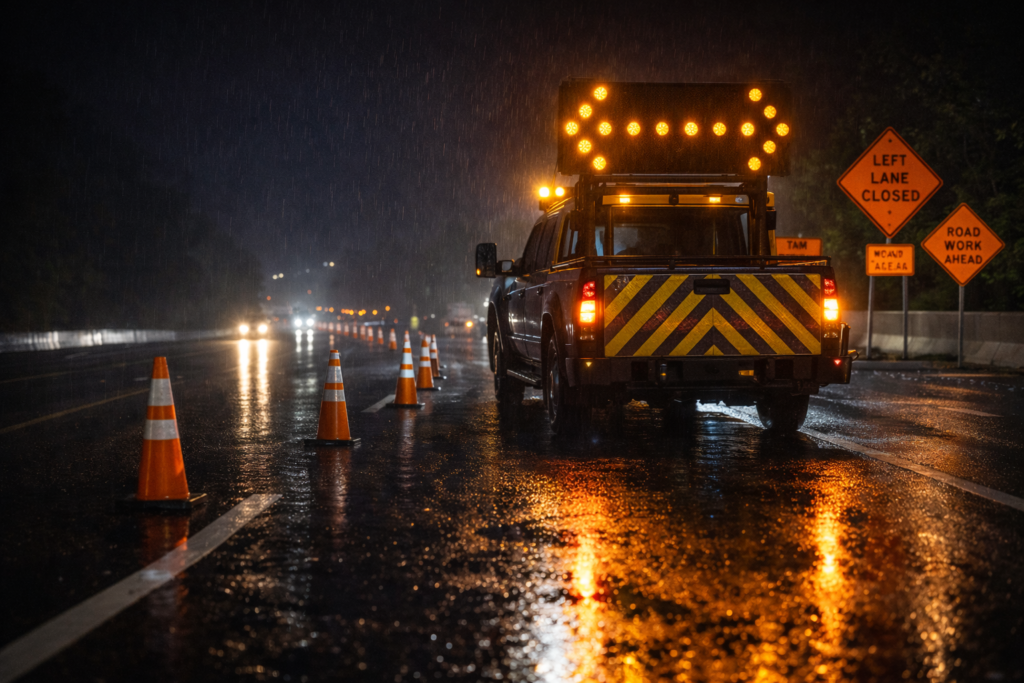
Device Readiness: Signs, Channelizers, Arrow Boards, and TMAs After Dark
Night device performance is not only “is it placed.” It is “is it readable under headlights, in rain sheen, and with work lighting in the background.”
Retroreflective sign performance: Sign faces should be clean, undamaged, and oriented to approaching traffic. Dirt, warped panels, and tilted stands can reduce readability at night, so cleaning and replacement must be planned. [6]
Channelizing devices and taper integrity: The first third of the taper does most of the work. Spacing drift, knocked-over devices, or a gap at the taper start can erase the intended message. Repair drift immediately. [1][6]
Arrow board discipline: Confirm correct mode for the closure type, aim the board square to traffic, and set brightness so it is readable without a blinding bloom. Adjust as weather and ambient lighting change. [6]
Protective vehicle strategy: Treat the protective truck and attenuator as a positioning plan. Define where protection sits during setup, production, and closeout, and define movement rules so protection does not drift away from the most likely intrusion path. [6]
Night Work Zone Traffic Control Checklist for Illinois Crews
This checklist is designed for field use. Print it, keep it in the crew packet, and treat it as the shift’s quality control record.
Field use rule: If conditions change, re-run the relevant rows under Inspections and Changes before continuing, and document the trigger and correction. [4][6]
| Phase | Essential actions | Visibility-first checks | Owner | Record |
|---|---|---|---|---|
| Pre-mobilization | Confirm approved layout and window; assign roles and stop-work authority; stage devices in placement order; confirm staffing for protection and device checks | Verify lighting plan and glare controls; confirm device condition and power; confirm backup lighting and fueling plan | PM/Superintendent | Shift plan and equipment check |
| Setup | Deploy upstream protection; place advance warning; build taper; establish buffer and activity area; control access points | Approach check for early legibility; aim lights away from traffic; confirm no dark pockets in the activity area | Foreman and Traffic lead | Setup inspection notes and photos |
| Active operations | Maintain protection; control equipment movements; keep staging inside protected area; manage queues when triggers occur | Re-check device readability under changing conditions; keep work inside lit zones; adjust lighting for moving shadows | Foreman and Safety lead | Rolling check entries |
| Inspections | Opening inspection before production; interval checks during work; trigger checks after major moves or weather shifts | Clean sign faces; correct glare hot spots; repair taper drift; replace failed lights immediately | Assigned inspector | Night inspection checklist |
| Changes | Pause when the field no longer matches the approved plan; document change and obtain required approval; brief the crew | Re-run approach check after changes; verify modified layout stays readable and consistent | Supervisor | Change log and approval record |
| Closeout | Remove or cover devices per plan; pick up channelizers in reverse order under protection; sweep debris; verify open condition | Manage lighting during pickup to prevent glare; final drive-through for misleading messages or leftovers | Foreman and Traffic lead | Closeout record and lessons learned |
Lighting Approach Options and What to Watch For
Choose the lighting approach based on work type, geometry, ambient light, and how often the activity area moves. The best setup is the one that delivers controlled visibility without creating glare or confusion. [6]
| Lighting approach | Where it works best | Common risks | Practical mitigations |
|---|---|---|---|
| Balloon lighting | Confined activity areas needing uniform light | Glare and bloom; wind sensitivity; blocked sight lines | Keep out of the driver sight line; anchor and stabilize; reposition to reduce shadows |
| Light towers | Long linear work with predictable footprint | Hot spots and hard shadows; glare on curves and ramps | Aim downward and away from traffic; stagger spacing; service outside live traffic |
| Vehicle-mounted lighting | Short-duration or moving tasks | Lights shine into traffic; inconsistent coverage after moves | Movement rules and re-aim trigger; combine with supplemental fixed lighting when needed |
| Ambient lighting only | Well-lit urban segments with low-risk, short tasks | Dark pockets; wet reflections that hide devices; mixed shadows near structures | Verify with an approach check; add light at transitions; increase inspection frequency |
Night Closure Decision Flow
Use this flow in planning and again in the field when conditions change.
- Decision 1: Can drivers recognize the work zone early and can the task be lit without glare?
- If No: Redesign lighting/device package or change the window/location.
- If Yes: Continue.
- Decision 2: Is geometry or access complex (curves, ramps, intersections, pedestrians, frequent truck moves)?
- If Yes: Add protection and inspection staffing; tighten change control.
- If No: Continue.
- Decision 3: Are conditions reducing contrast (rain sheen, fog, snow film, dirty devices)?
- If Yes: Increase checks, adjust lighting, prepare to pause.
- If No: Continue.
- Trigger rule: If any trigger occurs (device failure at taper/buffer, glare complaint, repeated hits, intrusion/near miss):
- Pause, correct, document, re-inspect, then resume.
Running the Shift: Briefings, Setup Sequence, and Real-Time Checks
Night closures run best when they feel routine to the crew. Consistency reduces errors, and errors at night tend to compound quickly.
Briefing: Keep it short and specific. Confirm the work window, setup order, lighting and glare rules, protection positioning, inspection interval, and change control triggers. End with a single sentence the crew can repeat, such as: “Readable taper, controlled light, scheduled checks.” [6]
Setup sequence: Protect first, expose last. Stage devices in placement order, deploy upstream protection, install advance warning, build the taper, establish the buffer and activity area, then turn on and aim lighting after the final layout is set. [6]
Real-time checks: Assign a named person and a timed interval. When a check finds an issue, fix it immediately, log the correction, and restart the interval timer. [6]
If traffic behavior shifts, adapt. A developing queue changes the risk profile of the closure, even during off-peak hours. [2][6]
Inspection Routines That Prevent Shutdowns and Rework
Inspection is the quality system for traffic control. It is how you prove the work zone still matches what was approved and briefed, and it is how you catch small failures before they become shutdown-level problems. [4][6]
Opening inspection: Verify sign order and orientation, taper completeness and alignment, device cleanliness, protective vehicle position, and lighting without glare before production begins. [6]
Rolling inspection interval: Use an interval that matches risk, plus trigger checks after deliveries, major equipment moves, weather shifts, or complaints of glare or confusion. [6]
Closeout inspection: Verify devices are removed or covered as required, check for debris, and complete a final drive-through to confirm there are no misleading cues left behind. [6]
Documentation supports compliance readiness by showing that your work zone is actively managed, not simply installed and forgotten. [4][5]
Change Control: Keep Field Adjustments from Becoming Rework
Small moves can change driver expectancy and shift the most critical decision point. If the field condition no longer matches what the crew briefed, pause and reset.
Changes that typically require documented approval include: altering closure length beyond defined limits, changing lane configuration or ramp access, moving the taper in a way that changes upstream decisions, substituting device types, changing protection strategy, or modifying pedestrian routing. When in doubt, document and escalate before you proceed. [4][5]
A minimal change log should capture time, reason, what changed, who approved, and what visibility verification was performed after the change (for example, an approach check). [6]
Closeout: Reopening Lanes Without Leaving Surprises
Closeout can be the highest-exposure phase because devices and people return to the edge of live traffic while fatigue is rising.
Reverse the sequence: Pick up channelizers in reverse order so the taper remains readable until the final devices are removed. Keep protection in place for pickup and manage lighting so it does not swing into approaching traffic as equipment moves. [6]
Final verification: Sweep for debris and complete a last drive-through to confirm there are no misleading cues left behind, such as a turned sign face or a leftover cone suggesting a false taper. [6]
Common Failure Modes at Night
- Drivers brake late or drift toward the taper: restore upstream legibility by cleaning sign faces, correcting orientation, and tightening taper alignment.
- Crew reports squinting, headaches, or eye fatigue: correct glare immediately by re-aiming, shielding, or repositioning lights.
- Repeated hits on the same device: treat it as a visibility and geometry issue, adjust within approvals, and increase inspection frequency.
- Arrow board looks washed out or blinding: verify mode and aim, then adjust brightness to regain contrast.
- Taper keeps drifting during production: assign a dedicated device maintenance role and enforce the interval. [6]
Accessibility at Night: Pedestrian Routing, Lighting, and Detectability
Pedestrian volume may be lower at night, but confusion is more dangerous because fewer cues are visible and drivers may not expect people near the roadway.
Accessibility callout: If a sidewalk is closed or shifted at night, the detour must be continuous, well lit, and separated from traffic and the activity area. Avoid routing people through dark gaps or uncontrolled crossings. [1][6]
Night checks should confirm the detour is obvious at real decision points, the walking surface is stable, and lighting supports detectability at crossings and conflict points. [6]

FAQ for Nighttime Work Zone Operations
What should a night work zone lighting plan include? Zone-by-zone objectives, equipment placement and aiming, glare controls, power logistics, and inspection triggers for adjustments. [6]
How do you reduce glare for drivers and workers at night? Aim lights downward and across the task, use shielding where possible, keep bright sources out of the driver approach view, and verify with an approach check after setup. [6]
What should be inspected every night before opening a lane closure? Confirm the layout matches approvals, devices are clean and aligned, the taper is complete, protection is positioned correctly, and lighting is adequate without glare. [4][6]
How often should devices be checked during active night work? Use a documented interval based on risk, plus trigger checks after weather shifts, major moves, or any sign of driver confusion. [6]
What changes require re-approval or documented change control? Changes that affect footprint, lane configuration, access, device type, protection strategy, or pedestrian routing typically require documented approval under your project process. [4][5]
Next Steps: Keep the Night Closure Predictable
Night closures run best when they are repeatable. Standardize the briefing, build lighting and glare control into the plan, assign inspection ownership, and document changes before they become rework.
Primary action: Download the “Night Work Zone Inspection Checklist” PDF for your crew packets.
Secondary action: Request a night work zone field audit or traffic control review to identify visibility gaps, device performance issues, and change-control risks before the first closure.
Key Takeaways
- Use a visibility-first approach: controlled lighting, glare management, and device readability verified from the driver approach
- Assign ownership for rolling checks so devices stay aligned, clean, and functional throughout production
- Use the phase-based checklist to standardize setup, inspections, change control, and closeout across every night shift
- Treat changes as controlled events: pause, document, verify visibility again, then resume
- Keep pedestrian detours continuous, well lit, and separated so night routing stays obvious and safe
References
Standards and Regulations
[1] Manual on Uniform Traffic Control Devices, 11th Edition, Part 6 Temporary Traffic Control (PDF). (Accessed February 16, 2026).
[4] 23 CFR Part 630 Subpart J, Work Zone Safety and Mobility. (Accessed February 16, 2026).
[5] Implementing the Work Zone Safety and Mobility Rule Guide. (Accessed February 16, 2026).
Operational and State Guidance
[2] Night/Off-Peak Work Overview. (Accessed February 16, 2026).
[3] Illinois Work Zone Safety Materials (Contractor Resources). (Accessed February 16, 2026).
[6] Guidelines for Design and Operation of Nighttime Traffic Control for Highway Maintenance and Construction. (Accessed February 16, 2026).